


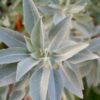


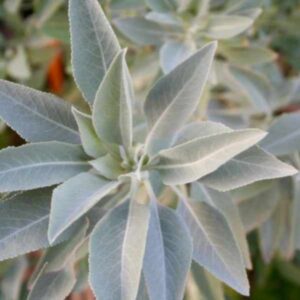
Sage White
$4.95
Salvia Apiana
- Seed Count 25
- Bee Sage or Sacred Sage
- Perennial
In stock
Description
Sage White is a large, herbaceous perennial, sometimes called ‘bee sage’’ or ‘sacred sage.’ It can grow to 1.5 meters in ideal conditions and is one of the larger plants in the salvia family.
The purple flower stalks are almost the same height again and bear small white to lavender flowers in Spring and Summer. The Latin suffix ‘apiana’ denotes bee attracting qualities.
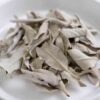
White Sage is a ceremonial herb of the North American Indians. The white leaves are burned to cleanse the spirit and welcome positive thoughts.
The culinary uses include using the leaves to flavour food and grinding up the seeds to add flour. The seeds, roots and leaves are all edible and the silvery-white leaves are highly aromatic when crushed.
White Sage has naturally low germination rate and germination can be slow: up to 60 days. It requires a sandy soil such as a soil suitable for a succulent.
Moist fertile soil with a lot of compost is not suitable since it will retain water. The planting medium must drain freely.
Scarify seeds with the gentle side of a nail file or fine grit sandpaper to break through the hard shell so the seed can absorb water after planting.
Sow the seeds in sandy soil, barely cover and tamp gently. Keep seeds trays warm in a strong light, watering once daily.
| Method: Sow direct | Soil Temp: 10°C - 25°C |
| Cool Mountain: Oct - Dec | Position: Full sun |
| Arid: Jun - Jul | Row Spacing: 50cm apart |
| Temperate: Sep - Dec | Planting Depth: 1 mm |
| Sub Tropical: Aug - Nov | Harvest: 180 days |
| Tropical: May - Jul | Plant Height: 150 cm |
Basics
- Capsicum (sweet/bell Capsicum) thrives in warm, sunny gardens.
- Plant them in a spot with full sun (6+ hours) and rich, well-drained soil.
- Prepare the bed by removing weeds and digging in plenty of compost or aged manure.
- Use mulch around plants to retain moisture and suppress weeds.
Seed Trays vs Direct Sowing
Seedling Trays:
- Raise seeds in pots or trays filled with seedling mix, keeping them warm (16-35°C) and moist.
- This protected start speeds germination and gives plants a head start on weeds and weather.
- You’ll use fewer seeds and get sturdy seedlings for an earlier crop.
- The downside is extra effort and cost (pots, mix, heat source) and you must harden-off seedlings before planting out.
Direct Sowing:
- Plant seeds 3mm deep in the garden soil 50cm between plants, 60–100cm once it’s warm and frost-free.
- Direct sowing is simpler and cheaper (no trays or special mix), but germination is slower and more vulnerable to cold, pests or heavy rain.
- Capsicum seeds can take 1–3 weeks to sprout at 16–35°C.
- Ensure the soil stays evenly moist (not waterlogged) during this time.
In short: use trays if you want the best germination and an early start; sow direct if you prefer simplicity and have already warm conditions.
Planting and General Care
Timing & Spacing:
- Plant or transplant capsicum after all danger of frost has passed.
- In tropical/subtropical areas, Capsicums can even fruit year-round, but in cooler zones treat them as an annual summer crop.
Soil:
- Use well-drained, fertile soil rich in organic matter.
- Work in compost or aged manure before planting.
- Capsicums prefer a slightly acidic to neutral pH (~6.0–7.0).
- In pots, use at least ~40L per plant.
Watering:
- Water deeply and regularly, so the soil stays evenly moist.
- Check soil moisture by pushing a finger 4–5cm down; water when that layer is just dry.
- Water in the early morning or late afternoon to minimize stress.
- Avoid wetting the leaves, which can encourage fungal disease.
- Mulch around plants to keep roots cool and reduce evaporation.
Fertilising:
- If the soil was well-prepared, you may need little extra feed.
- Otherwise, apply a balanced (e.g. 10-10-10 NPK) slow-release fertilizer at planting.
- Once flowers and fruit start, give a liquid tomato or vegetable fertilizer every few weeks according to label directions.
- This supports heavy fruiting. Avoid excessive nitrogen late in the season, as it can reduce fruit set.
Staking & Pruning:
- Capsicum plants can get top-heavy with fruit. Stake or cage them when planting.
- A simple sturdy stake beside each plant works – gently tie the main stem (e.g. with soft string) as it grows.
- This prevents wind damage and keeps fruit off the ground.
- Remove any low or damaged leaves to improve air flow.
- Many gardeners also pinch out a few early flower buds when plants are young – this encourages stronger vegetative growth and heavier later yields.
- Overall, little pruning is needed beyond this.
Pest & Disease Management:
- Monitor plants for pests like aphids, caterpillars, slugs/snails, and chilli thrip.
- Hand-pick pests or use organic sprays if needed.
- Practice good hygiene: remove weeds and crop debris.
- Rotate capsicum/solanaceous crops to a different spot each year to reduce disease pressure.
- Common diseases include blossom-end rot (from inconsistent watering or low calcium) and fungal spots.
- Regular watering and mulch help prevent blossom-end rot.
- Crop rotation and not overcrowding plants also reduce problems.
Chilli Thrips: What They Are & How to Deal With Them
- Chilli thrips (Scirtothrips dorsalis) are tiny, slender insects that can cause big problems in home veggie patches—especially for capsicum, chilli, eggplant, and tomato plants.
- You might not see them easily (they’re less than 2mm long!), but the damage is easy to spot as leaves curl or look bronzed and scarred, buds drop off, and fruit can become deformed or scarred.
- These pests feed by piercing plant tissue and sucking out the juices, which leads to silvery or brown patches on leaves and distorted growth.
- They tend to hang out on the newest growth, flower buds, or the undersides of leaves—so grab a magnifying glass and check these spots first if your plants are looking stressed.
What You Can Do:
Prevention is key:
- Start clean – Avoid bringing in infested seedlings or cuttings.
- Attract beneficial bugs like lady beetles, lacewings, and predatory mites—they’ll help keep thrip numbers down.
- Plant flowers like alyssum, marigold, or dill nearby to draw in the good guys.
If they show up:
- Prune affected areas early to stop the spread.
- Hose them off gently with water to dislodge thrips from foliage.
- Apply insecticidal soap or horticultural oil, covering all leaf surfaces, especially underneath. Repeat weekly as needed.
- Rotate your crops each year to disrupt their lifecycle.
Tip: Thrips love hot, dry conditions—so keep your plants well-watered and mulched to reduce stress and deter infestations.
Companion Planting with Capsicum
Good companions:
- Herbs & Flowers: Basil, dill, parsley, coriander, chamomile and other aromatic herbs as they attract beneficial insects and may repel aphids or whiteflies. Garlic, onions, chives as their strong scent deters many pests. Marigolds, nasturtiums, borage, lavender as these flowers lure pollinators and trap pests (marigolds are famous for nematode control).
- Vegetables: Carrots, lettuce, spinach as they occupy shallow roots and don’t compete much with Capsicums. These can provide light ground cover under Capsicum plants. Tomatoes are sometimes planted alongside Capsicums (both like similar conditions) but be aware they share some pests/diseases so give them space and rotate beds regularly.
- Fruits: Strawberries and cucumbers have been noted as decent neighbours (shallow roots and shade from cucumber leaves can protect Capsicums).
Bad Companions
- Other heavy feeders or close relatives.
- Do not grow next to eggplants, potatoes or tomatoes in succession, as they share pests/diseases.
- Stay away from beans/peas and plants like fennel or dill, which can inhibit Capsicum growth.
- Squash and pumpkins (deep-rooted cucurbits) can out-compete Capsicums for nutrients.
- In short, pair Capsicums with light-feeders and pest-deterring plants, and keep them apart from other nightshades and big gourds.
Seed Saving
Saving your own Capsicum seeds is easy if you follow a few simple steps:
Select plants:
- Pick the healthiest plants with strong, typical fruit.
- If growing multiple types, isolate them (e.g. bag flowers or keep 20m+ apart) to prevent cross-pollination.
Harvest ripe fruits:
- Wait until Capsicums are fully ripe on the plant which is usually when they’ve changed to their final colour and just start to soften or wrinkle.
- Allowing fruits to over ripen a little ensures the seeds are mature.
Extract seeds:
- Cut the Capsicum in half and scoop or twist out the central core.
- Scrape out the seeds and remove as much of the inner flesh and pith as possible.
- Rinse the seeds in clean water to wash off any remaining pulp which helps them dry cleanly.
Dry seeds:
- Spread the seeds in a single layer on paper towels or a clean plate in a dry, shaded place.
- Let them dry completely over several days.
- They’re ready when you can crunch a seed in your fingers and it snaps rather than bends.
- Moisture is the enemy of seed storage, so make sure they feel fully dry.
Store seeds:
- Transfer the dried seeds to a paper envelope or small jar with a tight lid.
- Label with variety and date.
- Store in a cool, dark, dry spot (a refrigerator works well).
- Properly stored Capsicum seeds remain viable for about 3–4 years, so you’ll have plants for many seasons.
Climate and Growing Conditions
Sage is well-suited to Australia’s diverse climates, but it prefers:
Temperature:
- Sage thrives in warm, temperate climates.
- It can tolerate light frost but prefers temperatures between 15°C and 30°C.
Sunlight:
- Full sun (at least 6 hours of direct sunlight per day) is ideal.
Soil:
- Well-draining soil with a pH between 6.0 and 7.0.
- Sage does not tolerate waterlogged soil.
Water:
- Sage is drought tolerant once established.
- Overwatering can lead to root rot.
Cold Stratification
Cold stratification is not always strictly necessary, but it can significantly improve germination rates. If you skip stratification, you may still achieve some germination, but the process might be slower and less consistent.
1. Lightly dampen a paper towel or a small, lidded container of sand.
2. Spread the seeds on the moist paper towel or mix them with the damp sand.
3. Place the paper towel or sand with the seeds in a plastic bag or pop the lid on the container.
4. Store the bag in the refrigerator (not the freezer) for about 2–4 weeks. The ideal temperature range for cold stratification is typically between 1–5°C.
5. Ensure the medium stays slightly moist but not wet during the stratification period.
6. Proceed with seed method below.
7. You can also just pop your seeds in their packet into the fridge which is almost effective.
Starting Sage from Seed
Growing sage from seed requires patience, as it can be slow to germinate.
Seed Preparation:
- Sage seeds have a low germination rate.
- To improve success soak seeds in water for 24 hours before planting.
Sowing Seeds:
- Fill seed trays or small pots with a seed raising mix.
- Sow seeds 5 mm deep.
- Lightly water the soil and cover the tray with a plastic dome or cling wrap to retain moisture.
- Place the tray in a warm, sunny spot (20-25°C is ideal).
Germination:
- Germination takes 2-3 weeks.
- Keep the soil moist but not waterlogged.
- Once seedlings emerge, remove the cover and place them in a sunny location.
Transplanting:
- When seedlings are 5-7 cm tall and have at least two sets of true leaves, transplant them into larger pots or the garden.
- Space plants 50 cm apart to allow for growth.
Caring for Sage Plants
Watering:
- Water young plants regularly until established.
- Once mature, water sparingly.
- Allow the soil to dry out between waterings.
Fertilising:
- Sage does not require heavy feeding.
- Apply a balanced, slow release fertiliser in spring, or top dress with compost.
Pruning:
- Prune sage regularly to encourage bushy growth and prevent legginess.
- After flowering, cut back by one third to promote new growth.
Pests and Diseases:
Sage is relatively pest resistant but can be affected by
Whiteflies:
- Spray with neem oil or insecticidal soap.
Powdery Mildew:
- Ensure good air circulation and avoid overhead watering.
Harvesting Sage
- Begin harvesting once the plant is well established (usually 34 months after planting).
- Pick leaves as needed, preferably in the morning when the oils are most concentrated.
- For drying, harvest whole stems and hang them in a cool, dark place.
Companion Planting with Sage
Good Companions
Rosemary:
Both herbs have similar growing requirements and deter pests like carrot flies and cabbage moths.
Thyme:
Enhances sage’s flavour and repels harmful insects.
Cabbage Family (Broccoli, Cauliflower, Kale):
- Sage deters cabbage moths and other pests.
Carrots:
- Sage masks the scent of carrots, deterring carrot flies.
Tomatoes:
- Sage improves tomato flavour and repels whiteflies.
- Beans: Sage deters bean beetles.
Plants to Avoid
Cucumbers:
- Sage can inhibit their growth.
- Alliums (Onions, Garlic):
- These can stunt sage’s growth.
Benefits of Companion Planting with Sage
Pest Control:
- Sage’s strong scent repels many common garden pests.
Pollinator Attraction:
- Sage flowers attract bees and other pollinators.
Soil Health:
- Sage’s deep roots help improve soil structure.
Common Problems and Solutions
Leggy Growth:
- Prune regularly to encourage bushiness.
Yellowing Leaves:
- Often caused by overwatering.
- Reduce watering and ensure good drainage.
Poor Growth:
- Sage may struggle in heavy clay soils.
- Amend the soil with sand or compost.

Postage Charge
Orders under $30 attract a $4.95 shipping charge. Orders $30 and above have free shipping.
Order Times
Seed orders are normally dispatched within three business days. You will receive an email when seeds are mailed out.
Postage Days
Seeds are mailed out Monday to Friday at 1pm. Except for the Friday of long weekends.
Postage Times
WA 2-3 Days: SA,NT 3-5 Days: NSW, ACT, QLD, VIC: 5-7 Days
Carrier
We use Australia Post Letter Postage for the majority of orders
Not only are our seeds packed in recycled paper envelopes, we keep the theme going when we post out website orders. To protect your seeds from moisture and the letter box munchers (snails), we use a very special plastic free material made from plants. They are then put into recycled mailing envelopes. Green all the way 💚🌿
2 reviews for Sage White