


Native Indigo
$6.59
Indigofera Australia
- Seed Count 100
- Used For Natural Dyes
- Perennial
In stock
Description
Native Indigo is found naturally in every state across Australia, it’s one of our most widespread native shrubs, thriving from the edges of bushland to open grasslands. In the garden, it rewards even light care with graceful form and a long life, making it an ideal choice for anyone wanting to include a bit of home-grown character in their planting scheme.
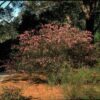
When you encounter Native Indigo in the wild, you might find it growing under fairly harsh conditions. Out there, it’s often straggly, with just a few main stems, shaped by wind, drought, and the animals that pass by. But when given a little attention in the garden, it transforms completely. With regular watering and a bit of protection in its early days, it becomes a refined, well-shaped plant, showing off sprays of finely divided blue-green foliage and strong, dark purplish stems. Its natural shape is upright but flexible, growing to around two metres high, with stems that tend to arch gently to one side.
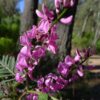
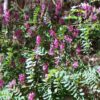
One of the first things you’ll notice when you touch the leaves is how smooth and velvety they feel. The leaflets are evenly spaced along the stems, each around ten centimeters long, giving the whole shrub a light, airy look rather than dense or heavy growth. There’s something clean and fresh about its appearance, especially during the cooler months when the foliage takes on that distinct blue-green glow that native gardeners love. This foliage alone would make Native Indigo a beautiful choice for mixed plantings or naturalistic borders, but its real moment of glory comes in spring. From mid-September through to November, Native Indigo produces clusters of small flowers along its stems, forming short, upright spires in soft shades of purple and pink.
It performs beautifully in low-maintenance gardens, cottage gardens, and flower gardens, and it’s equally at home in courtyards or large containers. Because it’s both hardy and non-toxic, it’s often chosen for public spaces and playgrounds where children and wildlife mingle freely. Coastal gardeners will find it especially rewarding since it tolerates salty air and poor sandy soils. As long as the soil is free of lime and drains well, Native Indigo will settle in easily and grow quickly once established.
The leaves contain a natural dye that, when extracted, produces a soft, gentle shade of blue known as indigo. This dye has long been prized for textile colouring, particularly in traditional tie-dyeing. The process is straightforward, and gardeners who enjoy a touch of craft or natural art often find this plant a delight to experiment with. The colour it produces isn’t the deep blue of imported indigo plants but a subtler hue that is fresh, calm, and true to the plant’s Australian character.
Because it’s part of the Indigofera family, Native Indigo also contributes to soil health by fixing nitrogen, enriching the ground around it naturally. This makes it a good companion plant for other natives or perennials that benefit from a bit of extra fertility in the soil. Over time, a garden that includes Native Indigo tends to become more self-sufficient, with less need for fertilisers and constant upkeep.
| Method: Start in Trays | Soil Temp: 18°C - 24°C |
| Cool Mountain: Sep - Dec | Position: Full sun |
| Arid: Mar - Jun | Row Spacing: 1 m apart |
| Temperate: Mar - Oct | Planting Depth: 1mm |
| Sub Tropical: Feb - May | Harvest: 700 days |
| Tropical: Apr - Jun | Plant Height: 2 m |
🌱 Starting From Seed: Trays vs Direct Sowing
🌿 Sowing in trays
I like trays for better control, especially if your garden has heavy soil or hungry snails.
When to sow
- Autumn in warmer regions and coastal gardens.
- Spring in cool and cold zones once the frost risk passes.
Aim for soil temperatures of 18–24°C during germination.
How to do it
- Pretreat the seed (details below).
- Fill small cells or a seed tray with a free-draining native mix. You can blend 2 parts native potting mix with 1 part coarse propagating sand or fine perlite.
- Sow seeds 5 mm deep. Firm gently.
- Mist to settle the mix, then water from below to avoid dislodging seed.
- Place in bright light with good airflow, not in direct midday sun.
- Keep evenly moist but never waterlogged. Aim for a light dry-down between waterings.
- Germination usually begins in 2–5 weeks after pretreatment, with stragglers catching up later.
Growing on
- Once seedlings have 2–3 true leaves, pot them up into 100–140 mm pots using native potting mix.
- Harden off outdoors for 10–14 days before planting.
- Plant out when roots hold the potting mix together and the seedling is sturdy.
🌾 Direct sowing
Direct sowing suits sandy or loamy beds that drain well and where you can protect seedlings.
When and where
- Sow in late autumn into moist, still-warm soil, or in spring after the last cold snaps.
- Pick a site that will be kept free of weeds and is easy to water lightly but regularly.
How to do it
- Prepare a fine seedbed. Remove weeds and rake to a light tilth.
- Mix seed with a little dry sand for even spread, or sow into shallow rows.
- Cover to 5 mm and firm gently.
- Mark the area, mulch around the line with fine mulch (not over the sowing line), and install snail barriers if needed.
- Water with a soft rose. Keep moist, not soggy, until established.
Tip: If your site crusts after rain, lay a strip of shadecloth over the row for the first fortnight to soften raindrop impact and keep the surface from sealing. Lift every few days to check moisture.
💧 Seed Pretreatment: Help Them Wake Up
Indigofera seeds have a tough coat. A simple hot-water soak or light scarification speeds things up.
Option 1: Hot water soak (easy and effective)
- Boil the kettle. Let it sit 2–3 minutes off the boil.
- Place seeds in a mug, pour the hot but not boiling water over them.
- Soak overnight as it cools.
- Next day, sow any seeds that swelled. Repeat once for stubborn seeds if needed.
Option 2: Scarification (for very hard lots)
- Rub seeds gently between two sheets of fine sandpaper, or nick the coat with a nail clipper.
- Do not cut into the embryo. A tiny break in the coat is enough.
- Soak in room-temperature water for 2–4 hours, then sow.
🌞 Soil and Position
- Sun: Full sun to light dappled shade. You will get denser growth and better flowering with more sun.
- Soil: Free-draining sandy loam to gravelly soils are perfect. It tolerates light clay if raised and well mulched, but avoid waterlogging.
- pH: Slightly acidic to neutral is ideal, though it tolerates mildly alkaline ground.
- Drainage first: If in doubt, build a mounded bed 15–25 cm high.
- Spacing: 1–1.5 m between plants if you want a soft hedge or to mix in a native border.
Fertiliser
As a nitrogen-fixing legume, Native Indigo does not need rich feeding. Use low-phosphorus native fertiliser sparingly if growth looks pale, or work in a thin topdress of mature compost around the drip line in late winter.
🛠️ Care and Maintenance
- Watering: Keep evenly moist while establishing. After the first summer, water deeply but infrequently. It copes with dry spells well.
- Mulch: A 5–7 cm layer of leaf litter or fine bark helps keep roots cool, suppresses weeds, and feeds soil life. Keep mulch back from the stem.
- Pruning: Tip prune lightly after flowering to keep it bushy, or give a harder cut by one-third in late winter if it has gone leggy.
- Staking: Usually not required, but young plants in windy sites can have a slender stake for the first season.
- Frost: Young plants appreciate a bit of protection in their first winter. Established shrubs tolerate light frost.
🌼 Companion Planting
Native Indigo plays nicely with other Australian natives and even kitchen-garden edges. It lifts the soil with its nitrogen-fixing nodules and offers light shade to groundcovers.
- Native grasses: Lomandra, Themeda, Poa. These knit the soil and frame Indigofera’s airy habit.
- Flowering companions: Brachyscome, Chrysocephalum apiculatum, Scaevola, native pelargoniums. Lots of nectar and colour for pollinators.
- Climbers nearby: Hardenbergia violacea can twine through a fence behind it for a layered native look.
- Shrub layer: Mix with Correa, Westringia, Callistemon for a resilient, bird-friendly hedge.
- Veggie edge: Plant on the sunny southern side of veg beds as a light shelter that will not cast heavy shade. Its roots help soil structure, and the shrub draws beneficial insects.
✂️ Harvesting
For dye or foliage
- Cut soft new growth during the active growing season. Morning harvest gives the best turgid foliage.
- Use clean, sharp secateurs and never remove more than one-third of the plant at once.
For seed
- Seed pods ripen from late spring to summer. Let pods fully mature on the plant until they turn brown and begin to rattle.
- Harvest on a dry day. Pop whole clusters into a paper bag to finish drying for a week somewhere airy.
🐞 Common Issues and Fixes
| Problem | Likely Cause | What You’ll See | Fix |
|---|---|---|---|
| Slow or patchy germination | Tough seed coat | Few seedlings after 3–4 weeks | Repeat hot-water soak or scarify a portion and resow. Keep 18–24°C and steady moisture. |
| Damping-off in trays | Poor airflow or soggy mix | Seedlings collapse at soil line | Use free-draining mix, water in mornings, improve airflow, consider bottom-watering. |
| Yellowing leaves on young plants | Overwatering or rich phosphorus | Leaves pale, slow growth | Let soil dry between waterings. Use low-P native fertiliser only if needed. |
| Dieback in heavy rain | Poor drainage or clay base | Stems brown from base | Raise bed, add gravelly material, mulch lightly, avoid watering during wet spells. |
| Chewed leaves | Caterpillars or grasshoppers | Shot-holes or missing leaflets | Handpick, encourage birds, use insect netting on seedlings if pressure is high. |
| Sticky leaves or sooty mould | Scale or aphids | Ant activity, black mould on honeydew | Blast with water, use horticultural oil on cool days, manage ants. |
| Sparse flowering | Too much shade or heavy pruning at wrong time | Lots of leaves, few blooms | Give more sun, prune lightly after flowering, avoid high-nitrogen fertilisers. |
🌾 Detailed Seed Saving Guide
- Selection
- Choose healthy, true-to-type shrubs with strong flowering and form. Mark a few plants to keep separate if you want to maintain local genetics.
- Harvest
- When pods turn brown and rattle, snip racemes into a paper bag. Avoid green pods. Aim for dry weather.
- Drying
- Spread pods on a fly-screen or tray in a shaded, airy spot for 5–7 days. Stir daily. Pods will split cleanly when fully dry.
- Threshing
- Rub pods between your hands inside the bag or over a tray. A short pulse in a hand mill set very wide can help, but be gentle.
- Cleaning
- Winnow chaff by gently blowing across the seeds from one tray to another, or use kitchen sieves. Aim for clean, heavy seed.
- Drying to store
- Dry to a firm, hard bite. If in doubt, add a small silica gel sachet to storage.
- Storage
- Label with species, location, and date. Keep in airtight jars or zip bags in a cool, dark cupboard. For long-term storage, refrigerate in a sealed container. Seed remains viable 2–5 years, often longer if kept cool and dry.
- Before next sowing
- Remember the hot-water soak or light scarification to wake seeds promptly.
🌿 Final Thoughts
Native Indigo rewards a small bit of setup with years of gentle beauty and good garden service. It feeds your soil, invites pollinators, and knits a planting together without fuss. Start a tray now, keep the moisture steady, and give the seedlings bright light and space. If germination feels slow, that is normal. The seed coat is just doing its job. With the simple hot-water soak and a patient eye, you will have sturdy young shrubs ready to settle in before you know it. An afternoon in the shed now will set you up for a smooth season.
1 review for Native Indigo
| 5 star | 100% | |
| 4 star | 0% | |
| 3 star | 0% | |
| 2 star | 0% | |
| 1 star | 0% |

Postage Charge
Orders under $35 attract a $4.95 shipping charge. Orders $35 and above have free shipping.
Order Times
Seed orders are normally dispatched within three business days. You will receive an email when seeds are mailed out.
Postage Days
Seeds are mailed out Tuesday to Friday at 1pm. Except for the Friday of long weekends.
Postage Times
WA 2-3 Days: SA,NT 3-5 Days: NSW, ACT, QLD, VIC: 5-7 Days
Carrier
We use Australia Post Letter Postage for the majority of orders
Not only are our seeds packed in recycled paper envelopes, we keep the theme going when we post out website orders. To protect your seeds from moisture and the letter box munchers (snails), we use a very special plastic free material made from plants. They are then put into recycled mailing envelopes. Green all the way 💚🌿
Delivery Guarantee
We take great care to make sure your seeds arrive safely. If your order is lost or damaged in transit, we’ll happily send a replacement. Unfortunately, we can’t replace or refund orders that arrive later than the estimated delivery date, as delays can sometimes occur that are outside our control.
Please note that all dispatch and delivery times listed are estimates only. While we do our best to post promptly, delivery timeframes can vary due to postal service delays, weather events, or other unforeseen circumstances. We’re unable to take responsibility for any loss, damage, or cost that results from a late delivery.
An order is not considered missing until at least 20 business days have passed from the postage date. You’ll receive an email once your seeds have been posted, letting you know they’re on their way. If you don’t see it in your main inbox, please check your Spam or Promotions folders as sometimes our emails like to hide there.

See all our verified customer reviews on our official CusRev profile.